定义及标准:
-
所有操作基于ubuntu 12.10 root用户。
-
所有备注用红色字体。
-
用户输入使用蓝色字体。
-
硬盘至少4G以上的剩余空间。
-
TF卡512M以上
-
教程制做内核版本为Linux-3.0.62+
-
默认路径为/root目录。
更新:
1.1版本
发现linux分区兼容性。一些杂牌卡,可能分区会有问题,尽量用品牌。此问题为linux下分区软件的问题。本文使用为sandisk的卡。
-
在ubuntu下安装如下软件,主要用于编译源码及基础系统安装
#apt-get install build-essential u-boot-tools qemu-user-static debootstrap emdebian-archive-keyring git libusb-1.0-0-dev pkg-config
#apt-get install gcc-arm-linux-gnueabihf; pc交差编译arm系统。
-
制做TF卡
-
插上TF卡后
查看TF信息
#ls /dev/mmcblk0*
/dev/mmcblk0 /dev/mmcblk0p1
注:可能你的显示不是以下信息。但至少有/dev/mmcblk0,说明你的tf已经被系统实别。注意,ubuntu系统默认有TF插入后会自动mount,请弹出不要挂载目录,以免无法进行以下操作。
#dd if=/dev/zero of=/dev/mmcblk0 bs=1M count=1
记录了1+0的读入
记录了1+0的写出
1048576字节(1.0 MB)已复制,0.118967秒,8.8 MB/秒
TF卡分区
# sfdisk –in-order -uM /dev/mmcblk0
Checking that no-one is using this disk right now …
OK
Disk /dev/mmcblk0: 486192 cylinders, 4 heads, 16 sectors/track
sfdisk: ERROR: sector 0 does not have an msdos signature
/dev/mmcblk0: unrecognized partition table type
Old situation:
No partitions found
Input in the following format; absent fields get a default value.
start size type [E,S,L,X,hex] bootable [-,*] c,h,s c,h,s
Usually you only need to specify start and size (and perhaps type).
/dev/mmcblk0p1 :1,16,c
/dev/mmcblk0p1 1 16 16 16384 c W95 FAT32 (LBA)
/dev/mmcblk0p2 :,,L
/dev/mmcblk0p2 17 15193- 15177- 15540736 83 Linux
/dev/mmcblk0p3 :
/dev/mmcblk0p3 0 – 0 0 0 Empty
/dev/mmcblk0p4 :
/dev/mmcblk0p4 0 – 0 0 0 Empty
New situation:
Units = mebibytes of 1048576 bytes, blocks of 1024 bytes, counting from 0
Device Boot Start End MiB #blocks Id System
/dev/mmcblk0p1 1 16 16 16384 c W95 FAT32 (LBA)
/dev/mmcblk0p2 17 15193- 15177- 15540736 83 Linux
/dev/mmcblk0p3 0 – 0 0 0 Empty
/dev/mmcblk0p4 0 – 0 0 0 Empty
Warning: no primary partition is marked bootable (active)
This does not matter for LILO, but the DOS MBR will not boot this disk.
Do you want to write this to disk? [ynq]y
Successfully wrote the new partition table
Re-reading the partition table …
If you created or changed a DOS partition, /dev/foo7, say, then use dd(1)
to zero the first 512 bytes: dd if=/dev/zero of=/dev/foo7 bs=512 count=1
(See fdisk(8).)
注:此步完成后,请执行以下命令,用于确定你的tf卡是否兼容linux的分区软件。
#fdisk -l /dev/mmcblk0
Disk /dev/mmcblk0: 15.9 GB, 15931539456 bytes
4 heads, 16 sectors/track, 486192 cylinders, total 31116288 sectors
Units = sectors of 1 * 512 = 512 bytes
Sector size (logical/physical): 512 bytes / 512 bytes
I/O size (minimum/optimal): 512 bytes / 512 bytes
Disk identifier: 0x00000000
Device Boot Start End Blocks Id System
/dev/mmcblk0p1204834815 16384 c W95 FAT32 (LBA)
/dev/mmcblk0p2 34816 31116287 15540736 83 Linux
注:请注意上面第一个分区,红色的2048,如果此处值不为2048,说明linux对你的卡不兼容,不支持这种制引导区方式。目前已知一种杂牌只有类似SD-C02G TAIWAN的卡不支持(移动送的,好东西,也不送你)。
解决办法如下:
使用berryboot-cubieboard等img文件在windows下刷到TF卡,安装系统完成后。拿到linux下接着往下执行,相当于使用已经分区的卡进行安装。如果哪位对这种无法识别的卡有更好的方法,请告诉我。
#mkfs.vfat /dev/mmcblk0p1
mkfs.vfat 3.0.13 (30 Jun 2012)
将第二分区格式化成ext4格式,看你的卡的容量,可能要稍等一会儿。
#mkfs.ext4 /dev/mmcblk0p2
mke2fs 1.42.5 (29-Jul-2012)
Discarding device blocks:完成
文件系统标签=
OS type: Linux
块大小=4096 (log=2)
分块大小=4096 (log=2)
Stride=0 blocks, Stripe width=0 blocks
972944 inodes, 3885184 blocks
194259 blocks (5.00%) reserved for the super user
第一个数据块=0
Maximum filesystem blocks=3980394496
119 block groups
32768 blocks per group, 32768 fragments per group
8176 inodes per group
Superblock backups stored on blocks:
32768, 98304, 163840, 229376, 294912, 819200, 884736, 1605632, 2654208
Allocating group tables:完成
正在写入inode表:完成
Creating journal (32768 blocks):完成
Writing superblocks and filesystem accounting information:完成
-
建立引导
#git clonehttps://github.com/linux-sunxi/u-boot-sunxi.git§
#cd u-boot-sunxi/
#make distclean CROSS_COMPILE=arm-linux-gnueabihf-
#make cubieboard CROSS_COMPILE=arm-linux-gnueabihf-
…………
…………
arm-linux-gnueabihf-objcopy -O srec hello_world hello_world.srec 2/dev/null
arm-linux-gnueabihf-objcopy -O binary hello_world hello_world.bin 2/dev/null
make[2]:正在离开目录`/root/cubieboard/u-boot-sunxi/examples/standalone’
make -C examples/api all
make[2]:正在进入目录`/root/cubieboard/u-boot-sunxi/examples/api’
make[2]:没有什么可以做的为`all’。
make[2]:正在离开目录`/root/cubieboard/u-boot-sunxi/examples/api’
make[1]:正在离开目录`/root/cubieboard/u-boot-sunxi’
#dd if=spl/sunxi-spl.bin of=/dev/mmcblk0 bs=1024 seek=8
记录了20+0的读入
记录了20+0的写出
20480字节(20 kB)已复制,0.0129492秒,1.6 MB/秒
#dd if=u-boot.bin of=/dev/mmcblk0 bs=1024 seek=32
记录了168+1的读入
记录了168+1的写出
172976字节(173 kB)已复制,0.0515786秒,3.4 MB/秒
#cd ..
-
编译内核
下载内核源码,如果通过git下载可能时间较长。
#git clone git://github.com/linux-sunxi/linux-sunxi.git
#cd linux-sunxi/
检查内核源码树,是否纯净。不纯净,则会CLEAN。
#make ARCH=arm mrproper
使用sun4i的默认配置(第一次编译时使用)
#make ARCH=arm sun4i_defconfig
#
# configuration written to .config
#
;读取老的配置文件(非第一次编译时使用,用于更改内核配置)
#make ARCH=arm oldconfig
scripts/kconfig/conf –oldconfig Kconfig
#
# configuration written to .config
#
选择内核编译配置(根据个自的情况而定,选择完成后保存)
#make ARCH=arm menuconfig
scripts/kconfig/mconf Kconfig
#
# configuration written to .config
#
*** End of the configuration.
*** Execute ’make’ to start the build or try ’make help’.
编译内核,时间较长,请耐心等待
#make ARCH=arm CROSS_COMPILE=arm-linux-gnueabihf- uImage
scripts/kconfig/conf –silentoldconfig Kconfig
………………
………………
Image Name: Linux-3.0.62+
Created: Thu Feb 14 23:10:48 2013
Image Type: ARM Linux Kernel Image (uncompressed)
Data Size: 4106068 Bytes = 4009.83 kB = 3.92 MB
Load Address: 40008000
Entry Point: 40008000
Image arch/arm/boot/uImage is ready
注:请确认编译无误。正确应该看到Image arch/arm/boot/uImage is ready。否则请根据提示再执行#make ARCH=arm menuconfig; #make ARCH=arm CROSS_COMPILE=arm-linux-gnueabihf- uImage直至正确。一些选项可能造成编译无法编译通过,可以如果不是重要功能可以取消或与维护者联系。
#make ARCH=arm CROSS_COMPILE=arm-linux-gnueabihf- modules
CHK include/linux/version.h
………………
………………
LD [M] net/ipv6/xfrm6_mode_tunnel.ko
注:以上结果,因每个人选择不同结果不同,只是举例,请勿以此为结果。
请确保编译无误,正确应该看到类似LD [M] XXXX/XXXX/XXX.ko。否则请根据提示再执行#make ARCH=arm menuconfig; #make ARCH=arm CROSS_COMPILE=arm-linux-gnueabihf- uImage; #make ARCH=arm CROSS_COMPILE=arm-linux-gnueabihf- modules直至正确。一些选项可能造成编译无法编译通过,可以如果不是重要功能可以取消或与维护者联系。
#cd ..
-
制做script.bin
#git clonehttps://github.com/linux-sunxi/sunxi-tools.git§
# cd sunxi-tools
#make
gcc -g -O0 -Wall -Wextra -std=c99 -D_POSIX_C_SOURCE=200112L -Iinclude/ -o fexc fexc.c script.c script_uboot.c script_bin.c script_fex.c
ln -s fexc bin2fex
ln -s fexc fex2bin
gcc -g -O0 -Wall -Wextra -std=c99 -D_POSIX_C_SOURCE=200112L -Iinclude/ -o bootinfo bootinfo.c
bootinfo.c:在函数‘print_script’中:
bootinfo.c:274:25:警告:未使用的参数‘script’[-Wunused-parameter]
gcc -g -O0 -Wall -Wextra -std=c99 -D_POSIX_C_SOURCE=200112L -Iinclude/ `pkg-config –cflags libusb-1.0` -o fel fel.c `pkg-config –libs libusb-1.0`
gcc -g -O0 -Wall -Wextra -std=c99 -D_POSIX_C_SOURCE=200112L -Iinclude/ -o pio pio.c
pio.c:在函数‘do_command’中:
pio.c:313:57:警告:未使用的参数‘argc’[-Wunused-parameter]
gcc -g -O0 -Wall -Wextra -std=c99 -D_POSIX_C_SOURCE=200112L -Iinclude/ -o nand-part nand-part.c
得到fex2bin文件,这个是能把*.fex文件生成*.bin文件。
#cd ..
#git clonehttps://github.com/linux-sunxi/sunxi-boards.git§
#cd sunxi-boards/sys_config/a10/
在sys_config/a10目录下,我们能找到cubieboard.fex文件,这就是我们需要的
编译,得到script.bin
#../../../sunxi-tools/fex2bin cubieboard.fex script.bin
-
建立引导
建立引导区挂载点(注,此时应在a10#目录下,主要为了拷贝方便)
#mkdir -p /mnt/1
#mkdir -p /mnt/2
#mount /dev/mmcblk0p1 /mnt/1
#mount /dev/mmcblk0p2 /mnt/2
#cp script.bin /mnt/1/
进入内核目录
#cd ../../../linux-sunxi/
#cp arch/arm/boot/uImage /mnt/1/
-
建立rootfs
此处,是本人遇到的最大的麻烦。由于没有看清楚是ubuntu还是debain,导致死活无法引导,ubuntu的rootfs,引导时inittab已经不默认引导,安装时默认也无此文件,两者安装是有区别的。如果在ubuntu下直接使用inittab会循环出现如下信息:
3init: Failed to create pty – disabling logging for job
[ 5.140000] init: Failed to create pty – disabling logging for job
4init: Temporary process spawn error: No such file or directory
[ 5.150000] init: Temporary process spawn error: No such file or directory
有兴趣的朋友可以试一下。研究出来,可以告诉我一下,谢谢。
## debootstrap –arch=armhf –variant=buildd –foreign precise /mnt/
以下是我找的一个国内的debian arm的国内源,发现国内的一些源并不提供arm的源。即使如此,也是需要一点时间的,耐心等吧。
#debootstrap –arch=armhf –variant=buildd –foreign wheezy /mnt/2/ http://ftp.cn.debian.org/debian
………………
………………
I: Extracting liblzma5…
I: Extracting xz-utils…
I: Extracting zlib1g…
#ls /mnt/2
bin debootstrap etc lib mnt root sbin sys usr
boot dev home lost+found proc run selinux tmp var
以上是你rootfs中的基本文件。如果还觉得大,请自行处理。
拷贝arm的仿真环境
#cp /usr/bin/qemu-arm-static /mnt/2/usr/bin/
#chroot /mnt/2/
此时你将看到,你的提示符,前面已经加上I have no name!。
安装核心包
#/debootstrap/debootstrap –second-stage
I: Installing core packages…
………………
………………
I: Base system installed successfully.
这是啥,呵呵,你成功安装了最简系统。
接下来,可能是你容易忽略的一件事。更改你超级用户(root)的密码。
# chroot . passwd
Enter new UNIX password:
Retype new UNIX password:
passwd: password updated successfully
输入两遍一样的密码。方便的话能告诉我一下嘛。呵呵。。。
#exit
执行上面命令回到我们现实PC中。为什么呢。最小系统里工具比较少,折腾麻烦。而且我们还有工作没有做完。接着来。
现在我们将安装系统的模块。在此之前,请确认你的目录。
# pwd
/root/linux-sunxi
-
系统模块的安装
#make ARCH=arm CROSS_COMPILE=arm-linux-gnueabihf- INSTALL_MOD_PATH=/mnt/2/ modules_install
………………
………………
DEPMOD 3.0.62+
到此为止,你的系统,基本是安装完了。还需要最后一步。告诉系统,你的rootfs的位置。
#cd /mnt/1
#cat EOT boot.cmd
setenv bootargs console=ttyS0,115200 root=/dev/mmcblk0p2 rootwait panic=10 ${extra}
fatload mmc 0 0x43000000 script.bin
fatload mmc 0 0x48000000 uImage
bootm 0x48000000
EOT
#mkimage -C none -A arm -T script -d boot.cmd boot.scr
Image Name:
Created: Fri Feb 15 00:40:09 2013
Image Type: ARM Linux Script (uncompressed)
Data Size: 169 Bytes = 0.17 kB = 0.00 MB
Load Address: 00000000
Entry Point: 00000000
Contents:
Image 0: 161 Bytes = 0.16 kB = 0.00 MB
-
编辑inittab及fstab文件
#cd /mnt/2/etc/
#cat EOT inittab
T0:2345:respawn:/sbin/getty -L ttyS0 115200 linux
EOT
#cat EOT fstab
proc /proc proc defaults 0 0
/dev/mmcblk0p1 /boot vfat defaults 0 2
/dev/mmcblk0p2 / ext4 defaults,noatime 0 1
EOT
OK,整个系统制做完毕了。取卡。。。。
再取卡前,请先执行以下命令。
#cd
#umount /mnt/1
#umount /mnt/2
否则,你可能见到难见的黑屏。。。系统崩溃。。。
至此,全套终于打完。你可以把卡拨下来了。插到cubieborad上试试了。此方式安装也为没有hdmi接口显示器的用户安装系统带来了方便。可以直接用串口线连接,查看和执行。好人我就做到底吧,再把串连接也讲了吧。
http://onefishum.blog.163.com/blog/static/5184730520131151385937/
-
串口命令行执行
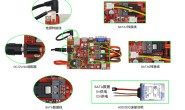
首先将cubieborad提供的串口线按如下方式,插在cubieborad§的ttl接口上。
黑色 接板子上的GND(地)
白色 接板子上的TX(写)
绿色 接板子上的RX(读)
红色 可以不接,如果接VCC,OK,你可以用不电源了(知道厂家为什么不提供电源了吧,哈哈),但不推荐,可能会造成cubieborad供电不足,一般的usb口只有500ma,cubieboard官方推荐是2A,但应个急还是很方便的。但也带不足,希望后面可以改进,就是不知道是开机还是关机,电源灯长红,哈哈哈。。。
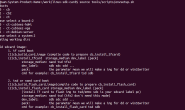
连上usb转ttl线后。(linux对USB转ttl线,一般是带有驱动的,你可以不用装了(还是linux方便吧。))
#ls /dev/ttyUSB*
/dev/ttyUSB0
看一下是否有USB0或1之类的,如上例你可以用screen命令连接。如果机器上没有。
#apt-get install screen
安装一下就行了。
#screen /dev/ttyUSB0 11520
即可。但你现在可能什么都看不到。因为cubieboard开机是自动启动的。你的程序已经启动。按一下回车。或长按电源键(10秒)重启试试。
在一堆字符飞快的闪过你的屏幕以后,你将看到熟悉的debian登录界面,恭喜你,费了这么大的劲成功了。
INIT: Entering runlevel: 2
[info] Using makefile-style concurrent boot in runlevel 2.
Debian GNU/Linux 7.0 xxxxxxx ttyS0
xxxxxxx login: root
Password:
叁考:
http://linux-sunxi.org/Bootable_SD_card
http://linux-sunxi.org/FirstSteps
http://linux-sunxi.org/BuildingOnDebian
本文使用wps for linux编辑,感谢wps对linux的支持。
没他的支持,春节前是拿不到CB的。