Ubuntu10.10下的中文字体有点少,将Windows的字库中一些常用的字体安装到Ubuntu中来,方便文档处理。安装和设置过程如下:
运行环境 | Enviroment
Ubuntu 10.10 (经测试,Redhat 5.x 和 CentOS 5.x也可以用同样的方法安装字体)
安装和设置字体 | How to install and setup fonts
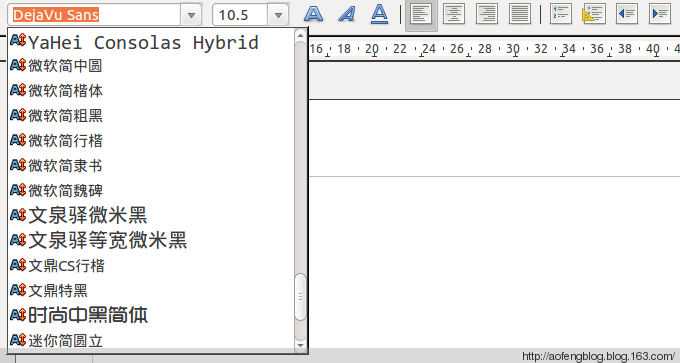
1、打开openoffice,可以看到如下的字体列表:
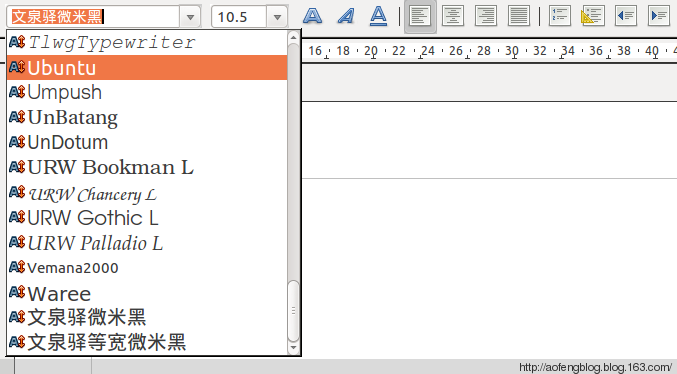
2、打开字体配置文件(需要root权限):/etc/fonts/fonts.conf,找到如下的配置内容:
dir/usr/share/fonts/dir
dir/usr/X11R6/lib/X11/fonts/dir
dir/usr/local/share/fonts/dir
dir~/.fonts/dir
增加自己的字体目录(
dir/usr/share/fonts/dir
dir/usr/X11R6/lib/X11/fonts/dir
dir/usr/local/share/fonts/dir
dir~/.fonts/dir
dir/devdata/fonts/dir
3、依次执行如下命令:
sudo mkfontdir
sudo fc-cache -fv
/usr/share/fonts: caching, new cache contents: 0 fonts, 3 dirs
/usr/share/fonts/X11: caching, new cache contents: 0 fonts, 6 dirs
/usr/share/fonts/X11/100dpi: caching, new cache contents: 0 fonts, 0 dirs
/usr/share/fonts/X11/75dpi: caching, new cache contents: 0 fonts, 0 dirs
/usr/share/fonts/X11/Type1: caching, new cache contents: 9 fonts, 0 dirs
/usr/share/fonts/X11/encodings: caching, new cache contents: 0 fonts, 1 dirs
/usr/share/fonts/X11/encodings/large: caching, new cache contents: 0 fonts, 0 dirs
/usr/share/fonts/X11/misc: caching, new cache contents: 0 fonts, 0 dirs
/usr/share/fonts/X11/util: caching, new cache contents: 0 fonts, 0 dirs
/usr/share/fonts/truetype: caching, new cache contents: 1 fonts, 14 dirs
/usr/share/fonts/truetype/freefont: caching, new cache contents: 12 fonts, 0 dirs
/usr/share/fonts/truetype/openoffice: caching, new cache contents: 1 fonts, 0 dirs
/usr/share/fonts/truetype/takao: caching, new cache contents: 1 fonts, 0 dirs
/usr/share/fonts/truetype/thai: caching, new cache contents: 54 fonts, 0 dirs
/usr/share/fonts/truetype/ttf-dejavu: caching, new cache contents: 6 fonts, 0 dirs
/usr/share/fonts/truetype/ttf-indic-fonts-core: caching, new cache contents: 17 fonts, 0 dirs
/usr/share/fonts/truetype/ttf-kacst-one: caching, new cache contents: 1 fonts, 0 dirs
/usr/share/fonts/truetype/ttf-khmeros-core: caching, new cache contents: 2 fonts, 0 dirs
/usr/share/fonts/truetype/ttf-lao: caching, new cache contents: 1 fonts, 0 dirs
/usr/share/fonts/truetype/ttf-liberation: caching, new cache contents: 12 fonts, 0 dirs
/usr/share/fonts/truetype/ttf-punjabi-fonts: caching, new cache contents: 2 fonts, 0 dirs
/usr/share/fonts/truetype/ubuntu-font-family: caching, new cache contents: 4 fonts, 0 dirs
/usr/share/fonts/truetype/unfonts: caching, new cache contents: 4 fonts, 0 dirs
/usr/share/fonts/truetype/wqy: caching, new cache contents: 2 fonts, 0 dirs
/usr/share/fonts/type1: caching, new cache contents: 0 fonts, 2 dirs
/usr/share/fonts/type1/gsfonts: caching, new cache contents: 35 fonts, 0 dirs
/usr/share/fonts/type1/mathml: caching, new cache contents: 1 fonts, 0 dirs
/usr/X11R6/lib/X11/fonts: skipping, no such directory
/usr/local/share/fonts: caching, new cache contents: 0 fonts, 0 dirs
/home/aofeng/.fonts: skipping, no such directory
/devdata/fonts: caching, new cache contents: 19 fonts, 0 dirs
/var/cache/fontconfig: cleaning cache directory
/home/aofeng/.fontconfig: cleaning cache directory
fc-cache: succeeded
如下蓝色加粗字体所示:当前的自定义字体目录共发现了19个字体文件。末尾出现 fc-cache: succeeded 表示加载字体成功。
正文结束
How To Install Microsoft Text Fonts In Ubuntu LinuxArial, Times New
Roman, Impact and Verdana are some of the most commonly used fonts. They
are so widely used in fact that whenever you open a Word document from
any computer, you immediately expect to find their presence. However, on
your newly installed Ubuntu (and many other Linux distros), you will
find that there is absolutely no trace of any of these fonts.
Ubuntu,
by default, does not include the commonly used Microsoft core fonts in
its installation. The set of fonts that it uses is not supported in
Windows or Mac. This means that if you create a document and send to
your partner for editing, he/she will not be able to view it in the way
that it was originally formatted. Vice versa, you won’t be able to view
the document that your friend sends you in the way that it was
formatted, unless he/she is using the same fonts as you.
Luckily,
installing the Microsoft core fonts package (and any other new fonts) in
Ubuntu is easy. Here’s how you can do it on your own:
Installing Microsoft Core Fonts in Ubuntu Linux
The Microsoft core fonts package consists of the following fonts:
- * Andale Mono
* Arial Black
* Arial (Bold, Italic, Bold Italic)
* Comic Sans MS (Bold)
* Courier New (Bold, Italic, Bold Italic)
* Georgia (Bold, Italic, Bold Italic)
* Impact
* Times New Roman (Bold, Italic, Bold Italic)
* Trebuchet (Bold, Italic, Bold Italic)
* Verdana (Bold, Italic, Bold Italic)
* Webdings
To install them, open up your Synaptic Package Manager (System – Administration – Synaptic Package Manager). Scroll down till you find msttcorefonts. Check the box beside it and select Mark for Installation. Click Apply at the menubar to install the fonts package.

Alternatively, if you prefer the terminal way, simply type the following command in your terminal.
sudo apt-get install msttcorefonts
Installing new fonts
Installing
the Microsoft core fonts package is only the beginning. There will be
many occasions where you need to install a new set of fonts for a
specific project. Here is how you can do it :
If you are installing the new fonts for personal use and do not want others to have access to them, simply create a .fonts folder in your Home directory and paste all the fonts into it. Here’s the steps:
- 1. Download the fonts (it should be in zipped format)
- 2. Extract the fonts.
- 3. Open nautilus (Places – Home). Press Ctrl + H to reveal all the hidden files and folders.
- 4. Check if the .fonts folder exist. If not, create the folder and name it .fonts.
- 5. Copy and paste the new font(s) into the .fonts folder.
- 6. Restart your application. The fonts should be available for your use now.
If you want to install system-wide and allow others to use it:
- 1. Create a new folder in your Desktop. Name it newfonts
- 2. Download the new font(s) and extract to the newfonts folder
- 3. Open a terminal
- 4. Key in the command: sudo cp -R ~/Desktop/newfonts /usr/share/fonts. This will copy your new font(s) to the system font folder.
- 5. Restart your application. The new fonts are now available for system-wide use.
If
you are using KDE, there is a font installer application that allows
you to install new fonts easily.The Font Installer application is found
under System Settings.

Now
that you have installed your favorite fonts in your system, here’s a
simple trick to improve the font rendering and make it look nicer.
Open up your Appearance configuration page (System – Preferences – Appearance)
Click on the Fonts tab. Under the Rendering section, check on the subpixel smoothing button.

You should notice the differences immediately.
If you are using Ubuntu 8.04 or an earlier version, this is what you need to do:
Type in the following command in the terminal
sudo ln -sf /etc/fonts/conf.avail/10-autohint.conf /etc/fonts/conf.d/
Logout and login again. You should see a noticeable difference in the font rendering.
http://www.makeuseof.com/tag/how-to-install-microsoft-core-fonts-in-ubuntu-linux/

